Easy connection to the Internet over Wi-Fi is no longer a privilege denied Linux users. With a recent distribution on a fairly recent laptop, connecting your Linux laptop to an available Wi-Fi network is often as easy as it is with your phone.
It wasn’t always like this. Wi-Fi has long been a running joke among Linux laptop users. Many a user would wipe their hard drives and install Linux only to find that they couldn’t get online. I went through this when I first installed Ubuntu 8.04 on my Asus Eee PC. (Luckily, the Eee PC came with an RJ45 ethernet jack.)
Getting Wi-Fi working is less of an issue today (though it still can be difficult on occasion). But just getting something to work is only the first step. With a little extra effort, you can optimize your Wi-Fi connections on Linux for the best speed and improved privacy.
 Alex Campbell
Using NetworkManager’s connection editor
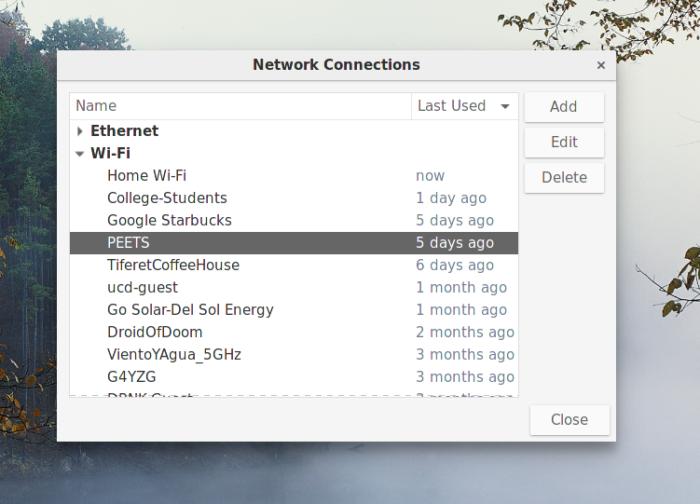
All of the features I’m explaining can be found in NetworkManager’s connections applet. For many users of Gnome or Unity (Ubuntu), you can simply click on the Wi-Fi or network icon in the top-right of your screen. In the drop-down menu, select Edit Connections. If you don’t see that option, or the correct window doesn’t appear, you can open a terminal window and launch it manually by typing nm-connection-editor and hitting Enter.
 Alex Campbell
 NetworkManager’s Edit Connections window.
Once the window opens, you should see a list of wireless connections under the Wi-Fi heading. (If you have any virtual private networks (VPNs) set up, you can see those details in the VPN heading that follows the Wi-Fi heading.) To edit the options for a connection, simply click the connection name and click Edit.
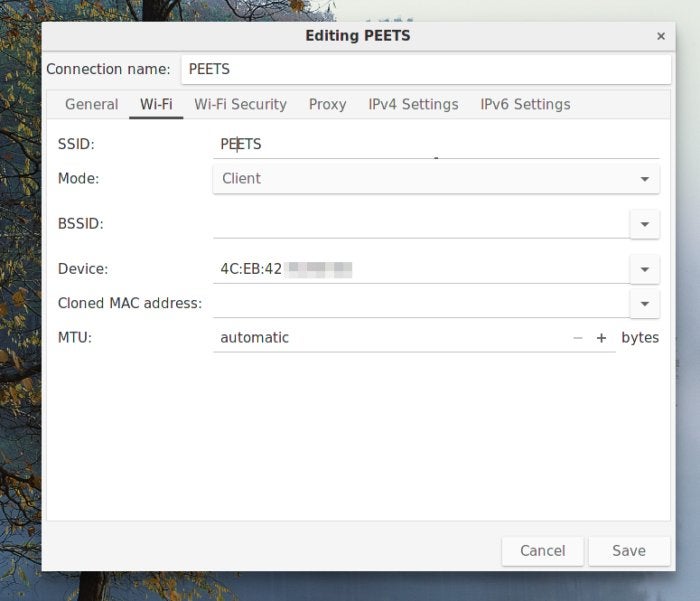
While the connection names default to the SSID (the name broadcast by the router) of the network, you can change the name to anything you like.
Enable automatic VPN connections
Using a VPN is one of the easier and more effective ways to protect your privacy online. While not everybody needs to use a VPN at home, I recommend that everybody use a VPN when connecting to public Wi-Fi, especially when doing things like online banking.
The thing is, it’s hard to remember to connect to your VPN every time you sit down in a coffee shop or airport. Luckily, NetworkManager makes it easy to “set it and forget it.”
 Alex Campbell
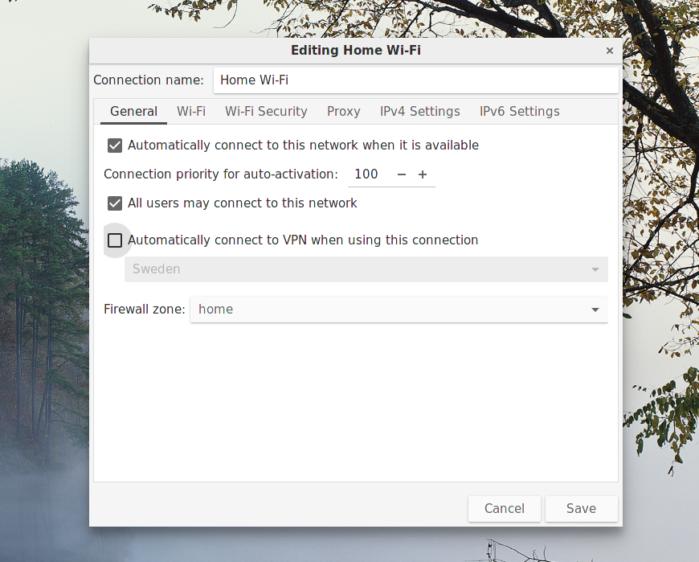
 You can choose to connect to a VPN on a per-connection basis.
In the General tab of the connection window, simply check the option labeled Automatically connect to VPN when using this connection. Doing so will enable the drop-down list below the check box. The drop-down list will be populated with any VPN connections you’ve previously set up. Select the VPN you want to use by default for the connection, and you’re all set.
Lock on to the best signal
Locking on to a specific Wi-Fi radio isn’t a feature most people need all the time, but it is useful in some situations. By default, your PC will try to lock on to and use the strongest signal that’s being broadcast with a given SSID.
It’s easier for users if a network administrator sets a single SSID for several wireless access points instead of forcing users to re-enter Wi-Fi credentials for each AP they try to connect to (e.g.: Office_floor1 and Office_floor2). As a user moves from one location to another, their device should lock on to the closest access point. But what if you’re somewhere in between?
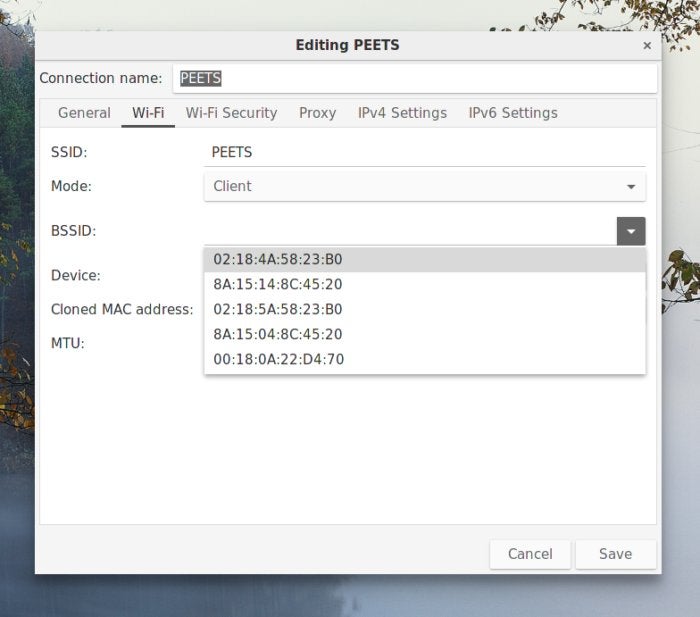
If an SSID has more than one AP with comparable signals, the networking stack on your PC will scan for the best one and switch from one AP to the other, seemingly at random. To stop this, you can “lock on” to one access point by specifying its BSSID.
 Alex Campbell
 You can “lock on” to a specific Wi-Fi radio by setting the BSSID for a connection.
In the Wi-Fi tab for the connection, simply select one of the BSSIDs from the drop-down menu, click Save, and reconnect to the network. Your PC should now use that specific access point.
If you still want the ability to get up and roam away from that access point on the same SSID, you can save the connection with a new name (not a new SSID!). Then, copy over all the connection details (SSID, WPA passphrase, etc.) from the other sections of the connection, but leave the BSSID option blank and save under a different connection name from the first one. One you’ve done that, you can select the “roaming” connection if you have to get up and take your laptop to a meeting, and use your preferred access point when you get back to your desk.
Set your firewall zone
As with a VPN, a firewall is advisable when using your PC away from home. Also, like a VPN, you can set NetworkManager to use a firewall policy of your choice according to the network you connect to.
Under the General tab for a connection, simply select a firewall policy in the drop-down menu next to the label Firewall zone. You need to have previously configured firewall zones (and have firewalld running as a service) in order to do this.
Keep your DNS wherever you go
If you’re not sure what a domain name service (DNS) is, you’re probably using the one assigned to you by default. Basically, DNS is a service that translates domain names (like pcworld.com) into IP addresses. Some people prefer to use DNS servers of their choice (like Google’s), instead of the servers handed to them by an ISP. If you want to ensure that you use the DNS servers of your choice as you move around from one wireless network to another, you just have to configure a few settings in each connection.
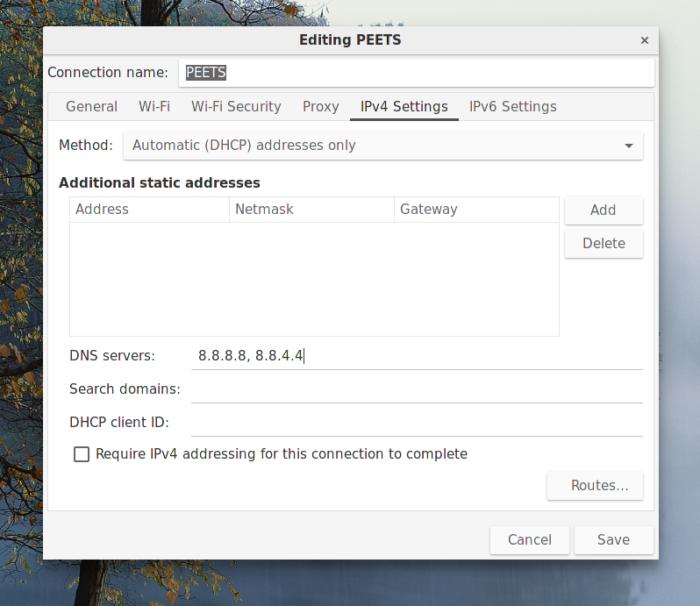 Alex Campbell
 You can set your own DNS servers, even when getting your IP address via DHCP.
In the IPv4 and IPv6 tabs, the first drop-down menu defaults to Automatic (DHCP). For most public wireless networks, you need DHCP to get an IP address and DNS information. However, the second option in the drop-down, Automatic (DHCP) addresses only, only gets an IP address from the network, and requires you to set up your own DNS information. After selecting the second option, the option in the tab Additional DNS servers will change to DNS servers. Simply type or paste the DNS servers of your choice into the box and click Save.
For reference, Google’s IPv4 DNS servers are 8.8.8.8 and 8.8.4.4. Google’s IPv6 server IPs are 2001:4860:4860:0:0:0:0:8888 and 2001:4860:4860:0:0:0:0:8844.
Conclusion
There are a few other options and features you can use to tweak your Wi-Fi connections, but these four should give you a great place to start. If for some reason anything goes wrong, remember that you can simply delete the connection and reconnect to the network (you’ll have to re-enter authentication details, of course).
While most Wi-Fi works fairly seamlessly without much configuration, a little attention can help you get the most out of your Wi-Fi card.
