In some categories of computer software, there are scant free options and spending a few bucks on paid software makes a big difference. In other categories, paying for software is not necessary. Video editing is one such example. In fact, one program widely used in Hollywood is free, and there are several other decent programs for Windows users—including the utterly fantastic DaVinci Resolve. Windows even has a built-in program now that Microsoft is the owner of the simple video editor Clipchamp.
In addition to introducing you to some of the best free video editing options, we’ll point you to websites where you can download free video clips, sound effects, music, and more to use in your films.
This article was translated from Swedish to English, and originally appeared on pcforalla.se.
Microsoft Clipchamp: Built-in and simple
In 2021, Microsoft bought the simple, web-based video editor Clipchamp and it’s now a built-in application in Windows 11. In its basic version, Clipchamp is free for everyone, but if you want more features, you’ll need a subscription. Luckily, it’s included in the Microsoft 365 subscription, so if you’re already subscribed to the Office programs, you’ll also get Clipchamp’s extra features.
Clipchamp has a simple interface with a timeline where you can place clips that you then trim and cut to create a film. Simply drag from the left or right edge of a clip in the timeline to trim. Move the time marker and click the scissors icon to the left above the timeline to split the clip into two parts that you can work on separately. To cut off a piece in the center of a clip, divide it into three parts. Then select the center section and click the the trash-can icon next to the scissors icon, or press the backspace key. Then move the following part back to close the gap.
You can separate audio and video for more advanced clips, and add transitions, text, still images, sound effects, and music. If you’ve been using Apple’s iMovie on the iPhone or iPad, for example, you’ll quickly adapt to Clipchamp.
One problem you’ll encounter if you capture video with an iPhone or newer Android phone is that the files you import are probably in HEVC format, which is not supported by Clipchamp. The program will convert these to H264 format on import, but it can take a while if the films are large and numerous.
For a much deeper dive into its capabilities, check out our tutorial on how to use Clipchamp, Microsoft’s sleeper-hit video editor.
Davinci Resolve: The giant
You don’t have to spend a single cent to edit video like a pro. Well, you’ll have to take a course or two to get as good as a pro, but you can use the same program as many pros—Davinci Resolve.
The program, from Blackmagic Design, is one of the four video editing program used in the movie and television industry, but unlike Adobe Premiere Pro, Avid Media Composer, and Apple Final Cut Pro, it’s free for individual users. There’s a paid version too, but it doesn’t add much that the average home user will miss.
Davinci Resolve has an interface similar to Premiere, so if you’ve tried that before, it might be a little easier to get started. However, because it’s a professional program with everything needed to edit video for television, there’s a learning curve. Expect to have to keep at it for a while and maybe watch the occasional guide on YouTube before you feel completely comfortable with the program.
Video editing in general is resource intensive, but Davinci Resolve is particularly so. It requires at least 16 gigabytes of RAM, an SSD for storage, and a graphics card or integrated graphics circuit with at least 2 gigabytes of video memory and support for OpenCL 1.2 or CUDA 11.
When you first start the program, you’ll be prompted to start your first project and can also choose which set of keyboard shortcuts you want to use—if you have used Premiere, for example, you may choose the same keyboard shortcuts it uses, but otherwise you can choose the program’s own shortcuts.
Foundry
Importing and sorting
Davinci Resolve is a so-called nonlinear editor, which means that any changes you make will not affect the original files. When you export a finished film, the program copies the selected parts from them and puts them together with the various effects and other changes you have made. Therefore, you can sort your original files as you wish, but be aware that you cannot delete or move them, as the program needs access to them in order to create a final film. For example, if you have the files on an external SSD and don’t have it connected when you try to edit, the program will display a large “Media Offline” warning.
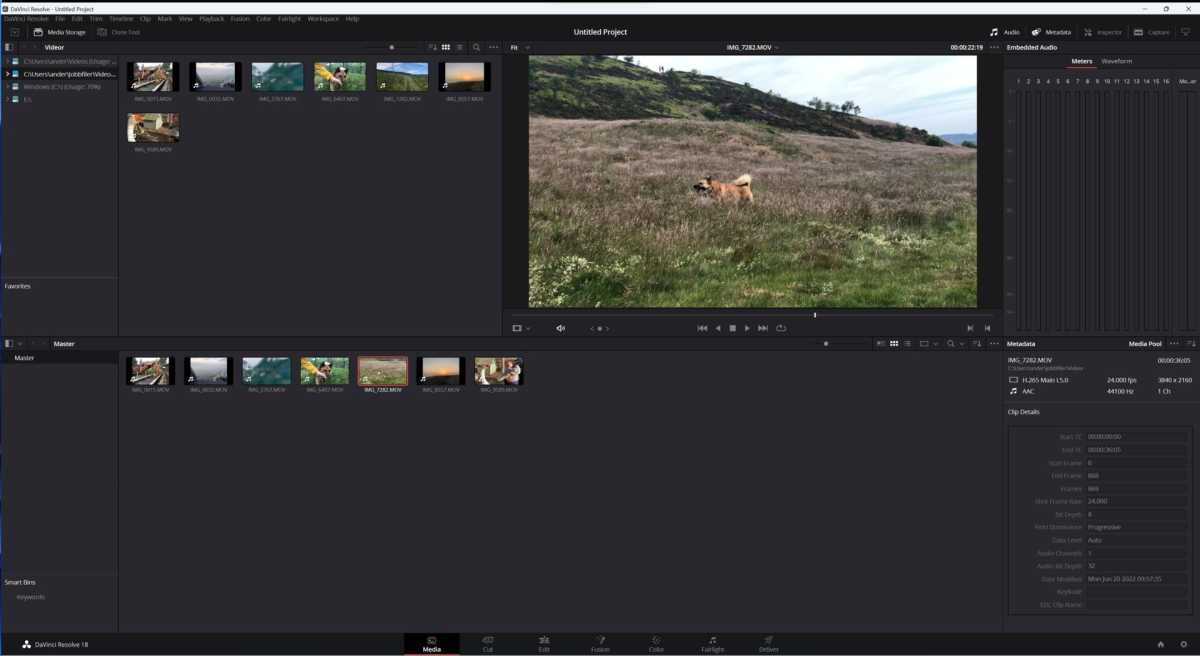
To add video files as clips to use in your projects, start by opening the Media tab. Then you can simply drag the files from Explorer into the program, which will chew on them for a while as the files load; they then end up in the Media Storage. Select a file to view the clip in the preview box at the top right. Here you can play the clip and also jump around in it via the timeline below.
Above the Media Storage area you will find Media Pool, which is also a grid of video clips. The difference between the two is that the Media Pool shows the files you have added to the open project. On the left is a panel where you can sort and organize all the clips—the Media Pool is also available in Davinci Resolve’s other work tabs (Cut, Edit, Fusion, Color, and Fairlight). You can create bins to collect different types of clips—for example, for different scenes or different locations. You can also differentiate using color-coding.

Foundry
Cut the film
Go to the Cut tab, where you will find the easier of two ways to put a film together. The interface here is divided into three main sections: the Timeline at the bottom where you place clips and do the actual editing, the Media Pool at the top left, from which you drag clips to be included in the Timeline, and the Preview at the top right.
Drag a clip from the Media Pool to the timeline to add it to your film. The simplest edit you can make is to trim the beginning and end. Hold your pointer to the edge of the clip so that it shows a small triangle, square brackets, and the beginning of a piece of film. Click and drag sideways to trim.
To divide clips into pieces so that you can work on each part separately, move the red time marker in the timeline and click the leftmost scissor button above the timeline.
You can also add only selected parts of a clip in the Media Pool to the timeline. Move the timestamp to where you want to add the new clip. Double-click the clip to open it in the preview. Locate the point in the clip you want to start at and press the i key. Then find the point in the clip you want to end at and press the o key. Then press F12 to add the selected part of the clip to the timeline.
To add transitions between clips, you must trim the clips at least slightly on both sides of the transition. Then place the timestamp in the center of the clips. Click one of the transition buttons in the center above the timeline: Dissolve or Smooth Cut. If you have trimmed the clips sufficiently beforehand, the transition now appears in the timeline and you can play the preview to see the transition.
Now click on Inspector at the very top right. This shows the settings for the transition, such as how long it should be, and you can also change the type of transition.
Other tabs
The Edit tab is a more advanced type of editing with much finer control, but also more fiddling to get the film right, so I recommend starting with the Cut tab until you feel it’s not enough.
Fusion is Davinci Resolve’s tool for building and working with special effects, and not something you should start with right away.
Foundry
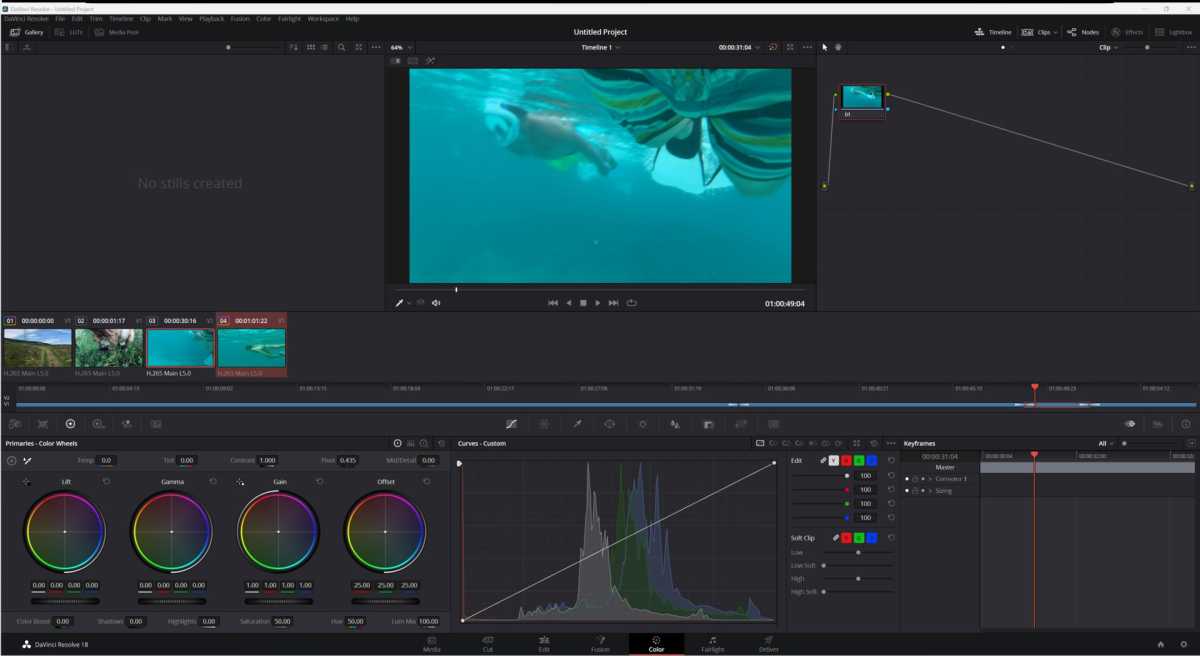
Color is all about adjusting exposure and colors either for effect or to make different clips blend together better. It’s something you’ll start using pretty soon if you’re putting together more ambitious films, such as the same scene shot with multiple cameras. The Color tab allows you to make these different angles show the same colors.
Two things you can try in the Color tab are Auto Color, which tries to optimize the colors in one or more selected clips, and automatic color-matching between clips. Select the clip you think has the right colors and then Ctrl-click on the clip you want to have the same colors. Right-click on the first one and select Shot Match to this Clip.
Fairlight is all about audio editing and effects. For example, you can remove or at least reduce the noise from a windy recording.
Foundry
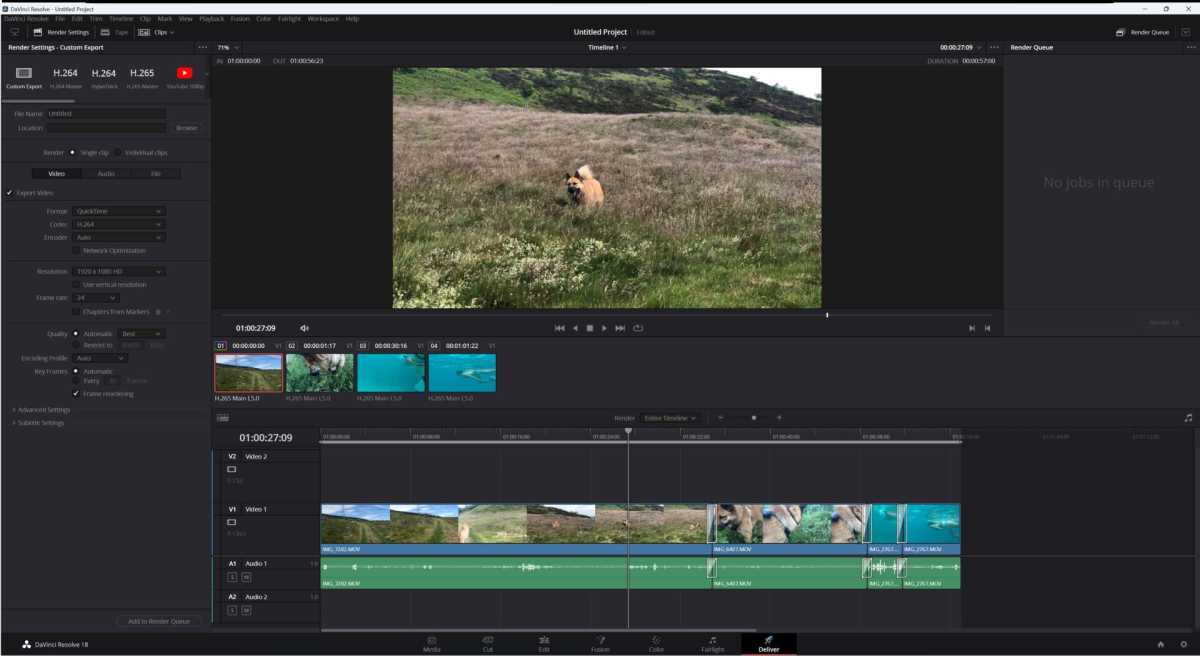
Deliver is the tab you use to export a finished film in a suitable format, and of course you can save different versions for different purposes. Here you can set the resolution, file format, and more before you start the export (which can take a while).
Foundry
Lightworks: A professional program with a good free version
If Davinci Resolve doesn’t appeal to you, you can try another program used professionally, but with a different approach to free users. Lightworks is a long-standing program that was used in the 1990s in Hollywood films such as Pulp Fiction and Braveheart. Thelma Schoonmaker, who has been editing Martin Scorcese films for 50 years, is one of its most famous users. The program has continued to evolve over the years, with different owners.
Since 2020, it is owned by the new company LWKS, started by two of the developers, who have chosen to provide the basic version of Lightworks completely free of charge. Unlike other “demo” versions of paid programs, almost nothing is missing. The only major limitation for home users is that finished films can only be exported at 720p resolution and not 1080p or 4K.
Like Davinci Resolve, Lightworks has a fairly steep learning curve. However, the interface has a clear focus on creativity, so if you roll up your sleeves and get started, it shouldn’t take long to get decent results. The program can be controlled almost entirely with the keyboard, so focus on learning all the shortcuts.

Foundry
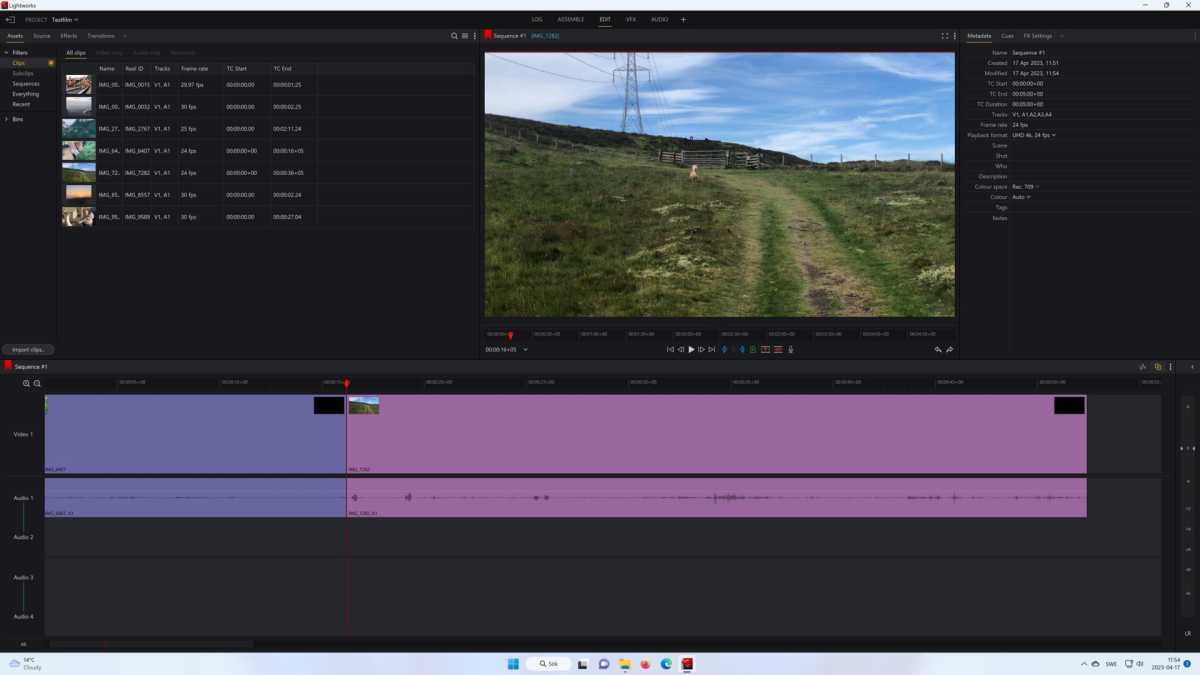
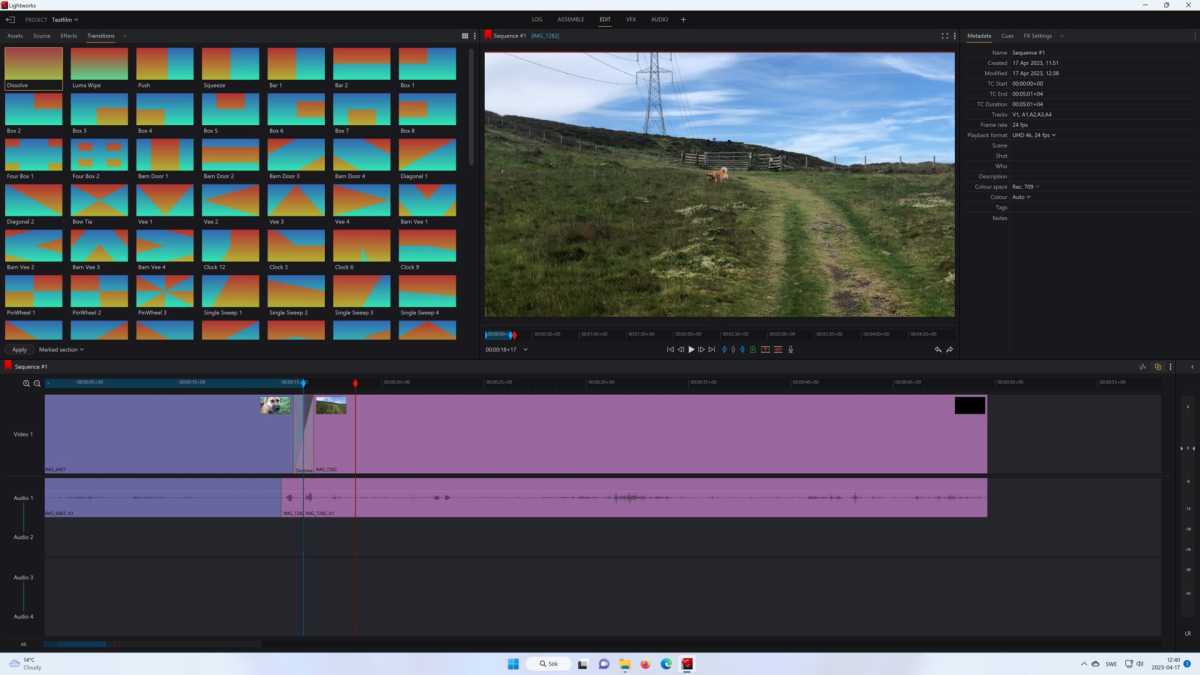
You start by creating a project and adding clips via the Import clips button. The interface is divided into three parts: Sources (clips, effects, transitions) at the top left, Preview and Info at the top right, and Timeline along the entire bottom of the window. Once you have some clips, you can drag one to the timeline to add it to the film. Here’s how to make simple cuts:
- Move the red time marker to the right place in the clip.
- Press the C key or the icon with two red arrows facing each other during the preview to split the clip.
- Now you can edit each half of the clip separately.
You can trim at the beginning or the end of a clip by either grabbing the edge and dragging with the mouse or moving the time marker with the A and S keys, pressing the W key to switch to trim mode and then press the comma or point to trim left or right. Press the tab when you are done.
If you have created a gap in the timeline by trimming in the center, you can automatically move the parts together by right-clicking in the gap and selecting Close gap.
Add simple transitions by selecting the tab Transitions at the top left and drag and drop a transition where you want it in the timeline and the program will do the rest.
Foundry
To create an overlap between sound and image (called a J or L clip), you can temporarily mute either the video or audio track and trim the other. Trim forward in one and backward in the other by an equal number of frames, then move them back together with both active. Lightworks shows with a little red icon how many frames out of sync the tracks are so you can easily fix it if you made a mistake.
Free resources
Here are some sites with an excellent range of free resources for video editing:
- Pixabay – music, sound effects, and video.
- Videvo – video, motion graphics, music, sound effects, and templates for Davinci Resolve.
- Freesound – Creative Commons licensed sounds of all kinds.
- Mixkit – video, music, and templates for Davinci Resolve.
- Envato Elements – Davinci Resolve templates.


