If you want to expand the storage of your PC with an additional SSD or HDD, it is not enough to simply install the drive in the PC. You must first convert the storage memory and then create one or more partitions in order to access it.
We will explain step by step how to proceed. You don’t need any additional software for this, the integrated Windows disk management is perfectly adequate. You can also convert a USB stick in the same way and make it ready for use under Windows.
Set up an SSD or HDD in 7 steps
1. First start Disk Management with the key combination Windows+X and a click on the corresponding menu item. Alternatively, open the Windows command prompt with Windows+ R, type diskmgmt.msc and confirm with the Enter key.
Further reading: Best SSDs of 2023
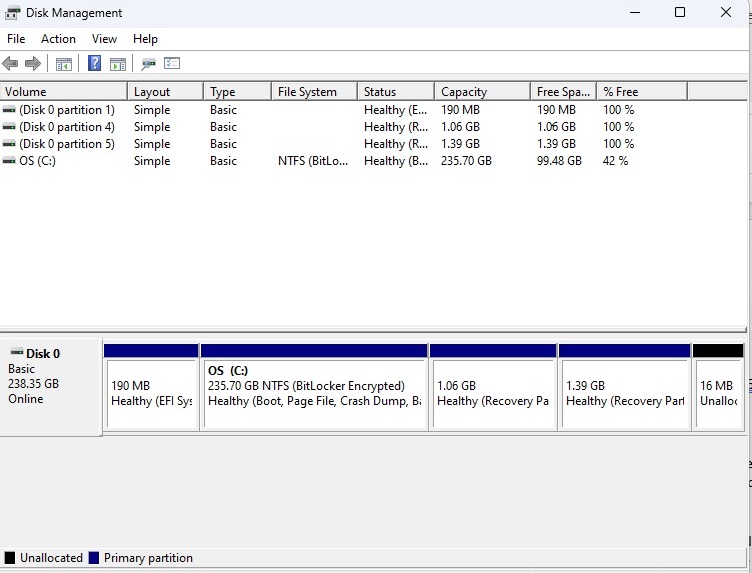
2. In the upper part of the user interface, you can recognize existing hard drive partitions with the assigned drive letters in brackets. The most important information is the file system, the total capacity and the free memory. The lower part of the window informs you about the physically available drive devices.

Foundry
3. Windows disk management is structured in such a way that right-clicking on a partition or an unallocated area calls up a context menu. Depending on this, other commands appear.
Right-click on an unallocated area of a drive (marked in black) to select “New simple volume” and click on “Next.” Windows suggests the maximum possible size. Accept this if the disck is not to be divided into more partitions, otherwise enter the desired drive size in MB.
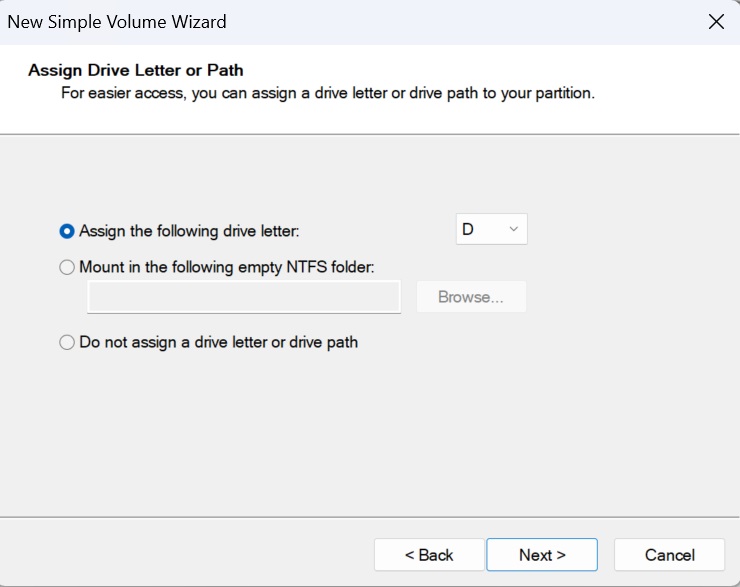
Click on “Next,” select a drive letter and then “NTFS” as the file system. Confirm with “OK.” That’s it — when you open Windows Explorer, you now have access to the partition you have just created.

Foundry
Further reading: NVMe vs. M.2 vs. SATA SSD: What’s the difference?
4. If you store private data on your computer that you don’t want other users to see, you can collect it on a separate partition and make it invisible in the next step.
Open Disk Management again. Right-click on the partition that you want to make disappear. Select “Change drive letters and paths” and click “Remove” in the following window. As soon as you have confirmed the warning with “OK,” the drive will no longer appear in Windows Explorer.

Foundry
To make it appear again, click on “Change drive letters and paths” again and then click on “Add.” As a rule, you can accept the Windows letter suggestion straight away. After clicking on “OK,” the drive is immediately accessible again in Explorer.
5. In the same window, you can also assign a different drive letter to a drive if you wish. To do this, simply click on “Change.” Now select a free letter and confirm the message.
6. To format an unformatted, external USB storage device on a Windows PC with the NTFS file system, open “Disk Management.” Plug the USB memory device into your PC. Ignore the Windows instructions.
The drive now appears at the bottom as a new drive. The unformatted memory is displayed with a solid black bar and is labelled “Unallocated.” Then right-click on the black bar and select the option “New simple volume…” from the context menu.
Click through the “Create Simple Volume Wizard.” You can leave all the default settings of the wizard as they are — including the NTFS file system. Assign a name for your USB storage device. Start formatting with “Finish.”
7. For some tasks, Windows 10 disk management is not suitable or only suitable to a limited extent. Do you want to move partitions or delete Linux partitions? Then you need a tool like Minitool Partition Wizard Free Edition. The free program offers numerous additional functions.
This article was translated from German to English and originally appeared on pcwelt.de.
